Painting the dream of the Himalayas but worried about the costs? You’re not alone. For many travelers, the Himalayas seem like a once-in-a-lifetime adventure that comes with a hefty price tag. The good news is that exploring Nepal’s world-famous trails, whether it’s Everest Base Camp, Annapurna Circuit, or hidden gems like Mardi Himal – doesn’t have to drain your wallet. With a little smart planning, you can enjoy breathtaking mountain views, rich cultural experiences, and authentic village life without overspending.
As we step into 2025 and beyond, Nepal continues to be one of the most budget-friendly trekking destinations in the world. Affordable teahouse accommodations, hearty local meals like dal bhat, and countless trail options make it possible to trek on a shoestring while still getting the full Himalayan experience. The trick lies in knowing where to cut costs and where not to compromise, because saving money shouldn’t mean missing out on comfort, safety, or unforgettable moments.
In this guide, we’ll share everything you need to know about budget trekking in Nepal: from choosing the right trek and permits, to transportation hacks, food and accommodation tips, and hidden costs most travelers overlook. Whether you’re a solo backpacker or traveling in a small group, these insights will help you stretch your rupees while maximizing your adventure.
Ready to discover how to trek smarter, not pricier? Let’s dive in.
Why Choose Nepal for Budget Trekking?
When it comes to affordable adventure travel, few places in the world can compete with Nepal. Tucked between India and China, this Himalayan nation is not just home to the highest peaks on Earth – it’s also one of the most budget-friendly trekking destinations for travelers of all kinds. Whether you’re a backpacker traveling on a shoestring or a culture enthusiast seeking authentic village life, Nepal offers incredible value for money without cutting back on the experience.
Affordable Yet World-Class Trekking
Unlike trekking hotspots in Europe or South America, Nepal keeps costs surprisingly low. A night in a teahouse often costs less than a cup of coffee in a Western city, while meals like dal bhat (a local rice-and-lentil staple) come with unlimited refills. Compare this to places like Switzerland or Peru, where mountain treks can cost hundreds per day, and Nepal’s affordability becomes clear.
Diversity of Trails for Every Budget
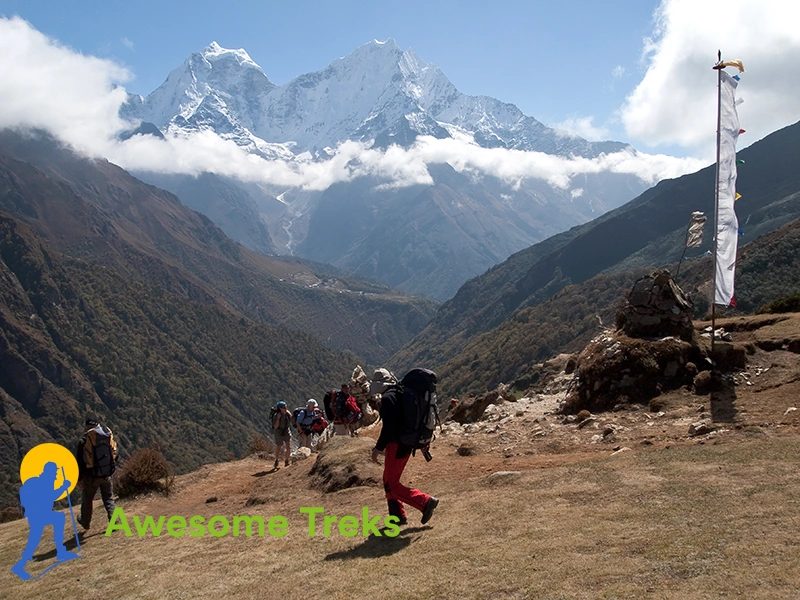
Another reason Nepal stands out is the sheer variety of treks. From short and budget-friendly routes like Ghorepani Poon Hill or Langtang Valley to bucket-list adventures like Everest Base Camp, there’s a trek to fit every budget and timeframe. Many trails can be done independently, reducing the need for expensive packages.
Rich Culture and Hospitality at No Extra Cost
In Nepal, saving money doesn’t mean missing out. The warmth of local teahouse owners, colorful prayer flags lining the trails, and centuries-old monasteries tucked in the hills are experiences that come free with the journey. The cultural immersion you get while staying in remote villages is something money can’t buy and yet, in Nepal, it’s part of even the simplest trek.
A Destination That Welcomes Budget Travelers
As Nepal continues to develop its tourism infrastructure in 2025 and beyond, budget trekking remains at the heart of its appeal. Affordable public transportation, low-cost permits, and widespread lodging options make it easier than ever to trek without overspending. In fact, most travelers are surprised at how far their budget stretches here compared to other destinations.
If you’re looking for an adventure that combines world-class scenery, cultural authenticity, and affordability, Nepal is your perfect match. It’s proof that you don’t need to be rich to trek among the world’s highest peaks – you just need the right plan.
Best Seasons for Budget-Friendly Trekking
When you’re trekking in Nepal on a budget, timing is everything. The season you choose doesn’t just influence the weather and scenery – it can also make a big difference in how much you spend. Knowing when to go can help you cut costs on flights, accommodation, and even permits, all while ensuring you still get the most out of your Himalayan adventure.
Peak Season vs. Off-Season
Nepal’s trekking calendar typically revolves around two peak seasons: autumn (September-November) and spring (March-May). These months bring clear skies, stable weather, and stunning mountain views, which is why they’re also the busiest and most expensive times. Teahouses and flights to trekking regions like Lukla fill up fast, and prices tend to rise with demand.
If you’re looking to save, consider trekking in the off-season:
- Winter (December–February): Trails are quieter, and accommodation is cheaper. The downside is colder temperatures, especially at higher altitudes, but lower routes like Ghorepani or Langtang remain manageable.
- Monsoon (June–August): This is the least popular season due to rain, muddy trails, and leeches. However, for budget travelers, it’s a hidden gem—accommodation prices drop, and you’ll enjoy lush green landscapes with far fewer crowds. Treks in the rain-shadow areas (like Upper Mustang or Dolpo) remain relatively dry even during monsoon.
Cost Benefits of Off-Season Travel
Traveling off-season not only lowers your daily costs but also gives you more bargaining power. Teahouses are eager for business, which means discounts on rooms and meals are easier to negotiate. Flights and buses to trekking regions are often cheaper too, especially if you book a little in advance.
Balancing Budget and Comfort
The trick is to find the balance between affordability and comfort. If it’s your first time in Nepal, you might want to avoid the extremes of winter or monsoon. A clever strategy is to trek just before or after peak season, late February or early September. This way, you still enjoy good weather while avoiding the highest prices and crowds.
In short, choosing the right season can stretch your rupees further while still giving you the chance to enjoy Nepal’s legendary landscapes. Budget trekking isn’t about sacrificing experience – it’s about trekking smarter, and timing plays a huge role in that.
Choosing the Right Trekking Route
Nepal is home to hundreds of trekking routes, each offering a unique mix of scenery, culture, and difficulty. But when you’re on a budget, choosing the right trek can make all the difference – not only for your wallet but also for the overall experience. Some treks are naturally more affordable because of their location, length, or accessibility, while others require bigger investments in transport and permits. Let’s break it down.
Popular Budget-Friendly Treks
- Langtang Valley Trek: Just a day’s drive from Kathmandu, Langtang is perfect for budget trekkers. Transport costs are low compared to flights to Lukla, and the trek takes about 7-10 days, keeping food and accommodation costs manageable.
- Ghorepani Poon Hill Trek: A short, scenic trek from Pokhara, lasting 4-5 days. It’s affordable, beginner-friendly, and offers breathtaking sunrise views over the Annapurna range.
- Mardi Himal Trek: A hidden gem that’s gaining popularity. This week-long trek is cheaper than longer circuits, with moderate costs for teahouse stays and meals.
Comparing Costs: Popular vs. Premium Treks
Treks like Everest Base Camp (EBC) and the Annapurna Circuit are iconic, but they’re more expensive because:
- EBC requires a costly Lukla flight.
- Annapurna Circuit takes 14-20 days, which means higher food and lodging expenses.
While these treks are worth it, you’ll need a larger budget compared to shorter, more accessible routes.
Factors That Influence Trek Costs
- Duration: The longer the trek, the higher the expenses for food, lodging, and permits.
- Accessibility: Road-accessible trailheads (Langtang, Ghorepani) are cheaper than fly-in treks (Everest region).
- Permit Fees: Some treks require multiple permits, while others only need a single TIMS card or conservation fee.
How to Pick the Right Trek on a Budget
- If you’re a first-time trekker: Choose shorter routes like Poon Hill or Mardi Himal.
- If you want a balance of cost and adventure: Go to Langtang Valley.
- If you’re willing to spend a little more for an iconic experience: Annapurna Circuit is a great mid-budget option.
By matching your trek to your budget and expectations, you’ll avoid overspending while still enjoying Nepal’s legendary mountain landscapes.
Understanding Trekking Permits & Fees
One of the most overlooked expenses in budget trekking is the cost of permits. Whether you’re hiking in the Everest region, the Annapurna trails, or the Langtang Valley, every trekker needs official permits. These fees may seem small, but they can quickly add up – especially if you plan multiple treks. Knowing what permits are required and how to get them will save you both money and stress. Learn More on Everest Trek Permits
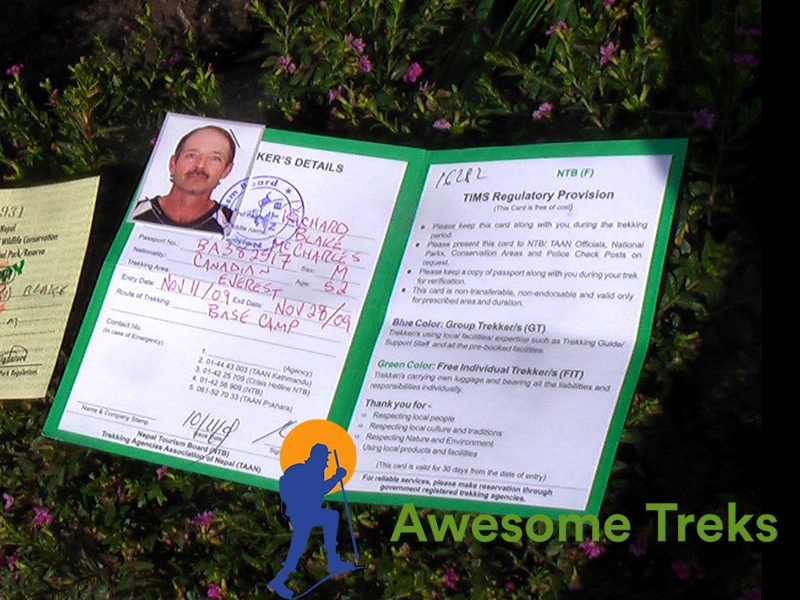
The TIMS Card (Trekkers’ Information Management System)
- Purpose: The TIMS card is used to register trekkers for safety and record-keeping.
- Cost (as of 2025): Around NPR 2,000 (USD 15) for independent trekkers; slightly lower if you’re with a registered trekking agency.
- Where to Get It: Nepal Tourism Board office in Kathmandu or Pokhara.
Budget Tip: Carry passport-sized photos and a copy of your passport to avoid extra charges when applying.
National Park and Conservation Area Permits
Depending on your trekking destination, you’ll need additional permits:
- Everest Region (Sagarmatha National Park): NPR 3,000 (USD 23).
- Annapurna Conservation Area (ACAP): NPR 3,000 (USD 23).
- Langtang National Park: NPR 3,000 (USD 23).
- Restricted Areas (Upper Mustang, Dolpo, Manaslu, etc.): Much higher fees (USD 50-500 depending on the duration).
These permits are checked at multiple entry points, so skipping them isn’t an option.
Hidden Costs Many Trekkers Miss
- Multiple Treks = Multiple Permits: Each trek requires separate permits, even if you’ve already paid once.
- Restricted Area Rules: In regions like Upper Mustang or Manaslu, you must travel with a licensed guide, which adds to costs.
- Local Municipality Fees: Some regions now charge an extra NPR 1,000-2,000 as local tax on top of standard permits.
How to Save on Permit Costs
- Choose treks in national parks or conservation areas rather than restricted zones.
- Stick to one trekking region if you’re short on time – this avoids paying for multiple permits.
- Always double-check fees with the Nepal Tourism Board before heading out, as rules and rates can change yearly.
Getting your permits sorted may not be the most exciting part of trekking, but it’s essential. Budget-conscious trekkers who plan ahead will avoid surprise costs and keep their adventure hassle-free.
Affordable Accommodation & Food
One of the best things about trekking in Nepal is how easy it is to find affordable food and lodging along the trails. Unlike treks in other countries that require expensive guided tours or camping equipment, Nepal’s teahouse system allows you to travel light and save money without compromising on comfort.
Budget-Friendly Accommodation Options
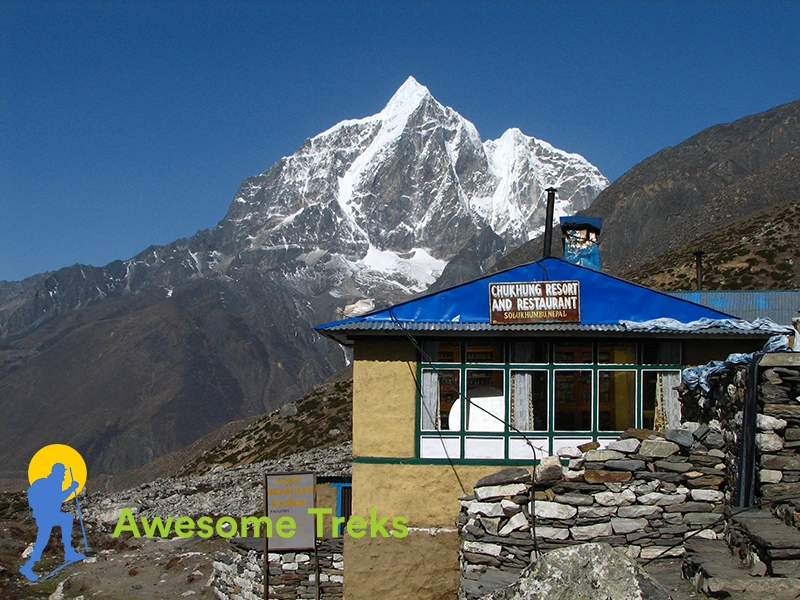
Most treks in Nepal are lined with teahouses – simple guesthouses run by local families. A basic room usually costs between NPR 500-1,000 (USD 4-8) per night, though in some remote villages, it may be slightly more.
- Rooms: Usually twin beds with blankets. Heating is rare, so a sleeping bag is useful.
- Bargaining: In less busy areas or off-season, you can often negotiate the room price, especially if you agree to eat meals there.
- Urban Hubs: In Kathmandu or Pokhara, budget hotels, hostels, and homestays are plentiful, starting from USD 5-10 per night.
Money-Saving Tip: Always ask if Wi-Fi, hot showers, or charging are included – some teahouses charge extra.
Eating on a Budget During Treks
Food will likely be your biggest daily expense, but there are ways to keep costs low.
- Dal Bhat Power: The classic Nepali meal of rice, lentil soup, and curry usually costs USD 3-5 in villages. The best part? It often comes with unlimited refills – perfect for hungry trekkers.
- Western Meals = Higher Costs: Pizza, pasta, or pancakes are available but cost nearly double. Stick to local food to save.
- Snacks & Drinks: Chocolate bars, bottled water, and soda get more expensive the higher you go. Carry trail snacks and use water purification tablets instead of buying bottled water.
Smart Food & Lodging Strategies
- Eat Where You Stay: Many teahouses offer cheaper or even free lodging if you eat dinner and breakfast there.
- Bring a Reusable Bottle: Refilling boiled water or filtered water saves money and reduces plastic waste.
- Share Meals: If you’re trekking with friends, sharing side dishes lowers costs.
In short, accommodation and food in Nepal are budget-friendly, but small daily savings add up. By choosing teahouses wisely, sticking to local meals, and carrying essentials like snacks and a water filter, you’ll keep your expenses low while still enjoying hearty food and warm hospitality.
Transportation Hacks for Budget Trekkers
Getting to and around Nepal’s trekking regions can be surprisingly affordable if you know how to navigate the options. Transportation costs often make up a significant portion of your trekking budget, so knowing the cheapest and safest ways to reach trailheads and move between cities can save you hundreds of dollars.
Getting to the Trailhead Cheaply
Most budget treks start from towns like Lukla, Syabrubesi, or Pokhara, and the cost to reach these points varies:
- Local Buses: The cheapest option, costing only (USD 3-10) depending on distance. Buses are slower but perfect for those on a tight budget.
- Tourist Buses: Slightly more expensive (USD 10-20), but more comfortable with fewer stops. Ideal for long distances like Kathmandu to Pokhara.
- Flights: Necessary for treks like Everest Base Camp, where Lukla is only accessible by air. Flights cost around (USD 150-200) one way, so consider this in your budget.
Tip: Sharing a taxi or jeep with other trekkers can significantly reduce costs if you need faster transport.
Budget Travel Around Kathmandu & Pokhara
- Public Transport: Local buses or microbuses are cheap (USD 0.50-2 per ride) for short distances within cities.
- Walking & Cycling: Many parts of Kathmandu and Pokhara are walkable, which saves money and allows you to explore local neighborhoods.
- Cheap Accommodation in City Hubs: Staying near the bus station in Pokhara or Kathmandu reduces taxi costs to trailheads.
Saving on High-Altitude Transport
- If your trek is accessible by road, taking a jeep or bus instead of a flight can save hundreds of dollars. For example:
- Kathmandu to Syabrubesi by bus in 6 hours, USD 5-8.
- Kathmandu to Jiri (alternative Everest route): 8-10 hours, USD 7-10.
- Kathmandu to Syabrubesi by bus in 6 hours, USD 5-8.
- Combine Routes: Some trekkers take a bus one way and fly back to save time while minimizing cost.
Hidden Transport Costs to Watch
- Airport taxes and baggage fees on small flights like Lukla.
- Extra charges for off-peak or early morning flights.
- Tips for drivers or guides if using private vehicles.
By choosing buses over flights where possible, sharing rides, and planning routes efficiently, budget trekkers can significantly reduce travel expenses. Smart transport planning ensures that your money goes toward experiences on the trail rather than just getting there.
Gear & Equipment on a Budget
Trekking in Nepal doesn’t require you to splurge on high-end gear, but having the right equipment is essential for comfort, safety, and enjoyment. With smart planning, you can equip yourself for the Himalayas without breaking the bank.
Renting vs. Buying Trekking Gear
Nepal, especially Kathmandu and Pokhara, has a wide range of rental shops catering to trekkers. Renting gear can save hundreds of dollars:
- Sleeping Bags & Jackets: Rent a down jacket or sleeping bag instead of buying a new one. Rentals cost USD 5-10 per day, much cheaper than buying internationally.
- Trekking Poles & Boots: Essential items like poles, boots, or gaiters can also be rented. Make sure you check the quality before heading to the trail.
- Where to Rent: Thamel in Kathmandu and Lakeside in Pokhara have multiple reputable rental shops.
Budget Tip: For items you plan to use repeatedly, such as trekking shoes or a waterproof jacket, buying locally can be affordable. Prices are lower than international retail, and brands like Quechua or North Face are available in Nepal.
Must-Have vs. Optional Gear
- Must-Have: Waterproof jacket, trekking pants, thermal layers, sturdy trekking shoes, hat, sunglasses, reusable water bottle, and a headlamp.
- Optional (Skip if Budget-Conscious): GPS devices, trekking gloves with expensive insulation, or portable solar chargers (can use teahouse electricity instead).
Packing Smart for Budget Travel
- Lightweight Packing: Carry only essentials to reduce fatigue and avoid hiring porters unnecessarily.
- Layering Clothes: Instead of buying multiple jackets, layer thermals and outerwear.
- DIY Solutions: Use reusable water bottles, pack small snacks, and bring basic first aid – these prevent buying expensive items on the trail.
Hidden Gear Costs to Consider
- Charging electronics: Bring a power bank or solar charger to avoid expensive teahouse charging fees.
- Laundry: Minimal laundry keeps costs low; most trekkers hand-wash clothes.
- Renting vs. buying: Calculate the total rental cost for long treks – sometimes buying is cheaper.
By choosing rentals wisely, packing smart, and focusing on essentials, trekkers can stay comfortable on the trails without overspending. Budget gear doesn’t mean compromising safety – it means making informed choices that maximize both comfort and savings.
Trekking Independently vs. With a Guide

One of the biggest decisions for budget trekkers in Nepal is whether to trek independently or hire a guide and/or porter. Both options have their pros and cons, and choosing the right approach can save you money while ensuring safety and a rich experience.
Trekking Solo (Independent Travel)
Going solo is the most budget-friendly option. It gives you flexibility, control over your schedule, and the freedom to choose cheaper teahouses or meals.
- Cost Benefits: No guide fees (USD 20-35/day) or porter fees (USD 15-25/day).
- Flexibility: You can start and end your trek on your own schedule, adjust routes, and spend less on accommodations by choosing only budget teahouses.
- Challenges: Independent trekkers need to handle navigation, permits, and potential language barriers. Safety is also a factor in remote regions.
Budget Tip: For first-time trekkers, consider joining small trekking groups online. Sharing knowledge and trail information can reduce the risk of getting lost and increase safety.
Hiring a Guide or Porter on a Budget
While hiring a guide adds costs, it has advantages:
- Guides: Cost around USD 20-35/day. They provide local knowledge, navigation skills, and cultural insights. Guides are required in restricted areas like Upper Mustang or Manaslu.
- Porters: Cost around USD 15-25/day. They carry heavy luggage, which allows you to hike lighter and save energy.
- Shared Services: You can reduce costs by sharing a guide or porter with other trekkers. Many agencies allow this, making it more affordable while still gaining support.
Factors to Consider
- Trail Difficulty: If the trek is challenging (high altitudes, remote regions), a guide adds value for safety.
- Budget vs. Experience: If money is tight, independent trekking is viable for well-marked and popular trails like Poon Hill or Langtang. For remote or culturally complex regions, a guide may enhance the experience and prevent costly mistakes.
- Ethical Hiring: Always pay guides and porters fairly, including tips, even on a budget. This supports local communities sustainably.
Choosing between solo trekking and hiring a guide is a personal decision that balances cost, comfort, and safety. Budget trekking doesn’t mean going it alone unless you’re prepared, but with careful planning, either option can give you a rewarding Himalayan adventure.
Money-Saving Travel Tips
Budget trekking in Nepal isn’t just about choosing cheap trails or teahouses – it’s also about smart daily decisions. Small savings add up, and knowing where to cut costs without compromising comfort or safety can stretch your trekking budget significantly.
Currency, ATMs & Payments
Handling money wisely is key for budget travelers:
- Cash is King: Most teahouses and small shops accept only cash. Carry enough Nepali rupees, especially for remote areas.
- ATMs: Available in Kathmandu, Pokhara, and major trailheads, but withdrawal fees can be high. Minimize fees by withdrawing larger amounts less frequently.
- Currency Exchange: Exchange money in official banks or trusted kiosks in Kathmandu for the best rates. Avoid street vendors.
Tip: Keep small denominations for teahouse payments, tips, and bus tickets.
Travel Insurance for Budget Trekkers
Even on a budget, insurance is essential. Trekking accidents or altitude sickness can be costly.
- Choose insurance that covers high-altitude trekking (up to 5,500-6,000m for most treks).
- Look for budget-friendly plans online or through local agencies. Prices start from USD 50-70 for short treks.
Avoid Hidden Costs
- Electronics Charging: Teahouses often charge USD 1-2 per device. Use a portable power bank or solar charger to save.
- Wi-Fi & Internet: Free Wi-Fi is rare on trails. Avoid paying for multiple hours; download maps or entertainment beforehand.
- Hot Showers: Usually USD 2-3. Consider skipping or alternating days to save money.
- Tips: Factor in small gratuities for guides and porters; budgeting in advance prevents overspending.
Smart Daily Habits
- Eat Local: Stick to dal bhat or local meals. Avoid expensive western food.
- Share & Reuse: Trekking in groups? Share snacks, toiletries, or reusable bottles to cut costs.
- Pack Efficiently: Bringing essentials reduces the need to buy expensive gear on the trail.
By planning your money carefully, staying aware of hidden costs, and adopting a few smart habits, you can significantly reduce your trekking expenses. Budget trekking in Nepal doesn’t mean compromising your experience – it means making informed choices that maximize adventure and value.
Sample Budget Breakdown for Trekkers
Planning a trekking budget can feel overwhelming, but breaking down expenses into daily and overall costs makes it much easier. Here’s a realistic look at how much you might spend on a budget-friendly trek in Nepal, based on different durations and spending styles in 2025.
Daily Costs on a Budget Trek
| Expense | Low-Budget Estimate | Notes |
| Accommodation | USD 4-8 | Teahouse rooms, twin-sharing, off-season bargains |
| Food | USD 5-8 | Dal bhat meals; occasional snacks or tea |
| Transportation | USD 1-5 | Local buses; shared jeeps to trailheads |
| Permits & Fees | USD 2-5 | TIMS and conservation area permit, averaged per day |
| Miscellaneous | USD 1-3 | Charging electronics, hot showers, small souvenirs |
Total Daily Budget: USD 13-29 per day
Sample Trek Budgets by Duration
- 7-Day Trek (e.g., Ghorepani Poon Hill): USD 90-200
- 14-Day Trek (e.g., Langtang Valley or Mardi Himal): USD 180-400
- 21-Day Trek (e.g., Annapurna Circuit short route): USD 270-600
Tips to Optimize Costs:
- Travel off-season for lower accommodation prices.
- Stick to local food; avoid western meals.
- Use buses instead of flights whenever possible.
- Share guides, porters, or transportation with other trekkers.
- Pre-plan permit costs and carry cash in small denominations to avoid extra charges.
Understanding Cost Ranges
- Shoestring Budget: Minimal teahouse stays, independent trekking, local food only.
- Mid-Range Budget: Occasional guide or porter, moderate meals, slightly higher-end teahouses in key locations.
- Comfort Budget: Private rooms, western meals occasionally, flights to remote trailheads, personal guide/porter.
Reflect & Explore
By breaking your expenses down this way, you can plan realistically and avoid surprises on the trail. With careful preparation, trekking in Nepal doesn’t require a huge budget– you just need smart choices and awareness of potential costs.
Budget trekking in Nepal proves that adventure doesn’t have to come with a hefty price tag. From the towering peaks of the Annapurna range to the serene villages of Langtang, you can experience the magic of the Himalayas without overspending – if you plan smartly. By choosing the right season, picking affordable treks, managing permits efficiently, and adopting money-saving strategies for accommodation, food, transport, and gear, your dream Himalayan journey becomes entirely achievable on a budget.
Remember, budget trekking doesn’t mean compromising the experience. The warmth of local hospitality, breathtaking sunrise views over snow-capped peaks, and cultural encounters in remote villages are priceless parts of your journey – and they’re accessible even for cost-conscious travelers. Small daily savings, smart planning, and a willingness to embrace simplicity allow you to stretch every dollar while still enjoying a fully immersive adventure.
As 2025 approaches, there’s no better time to start planning your trek. Whether you’re a first-time adventurer or a seasoned backpacker, Nepal offers routes, resources, and experiences that make budget trekking not only feasible but unforgettable. Take the first step, map your route, pack wisely, and prepare to explore the Himalayas without breaking the bank. Your adventure is waiting and it’s more affordable than you think.
FAQs
1. What is the cheapest trek in Nepal?
Some of the most affordable treks are Ghorepani Poon Hill, Langtang Valley, and Mardi Himal, as they are shorter, accessible by road, and have lower accommodation and permit costs.
2. Can I trek in Nepal without a guide?
Yes, many popular treks like Ghorepani or Langtang can be done independently. However, guides are recommended for remote areas, first-time trekkers, or restricted regions.
3. How much should I budget per day for trekking in Nepal?
On a shoestring budget, daily costs range USD 13-30, including accommodation, food, transport, and permits. Mid-range trekkers may spend USD 30-50/day.
4. What permits are required for trekking?
Most treks require a TIMS card (USD 15) and a national park or conservation area permit (USD 23). Restricted areas like Upper Mustang or Manaslu need special permits and guides.
5. Is food expensive on trekking trails?
No. Local meals like dal bhat cost USD 3-5, with unlimited refills. Western food is pricier, so sticking to local meals saves money.
6. Can I camp instead of staying in teahouses to save money?
Camping can reduce lodging costs but adds expenses for tents, stoves, and permits. For budget travelers, teahouses are often cheaper and more convenient.
7. When is the cheapest time to trek in Nepal?
Off-season trekking during winter (Dec-Feb) or monsoon (Jun-Aug) is cheaper. Accommodation, transport, and permits often cost less, though weather may be challenging.
8. Can I rent trekking gear in Nepal?
Yes. Kathmandu and Pokhara have rental shops for sleeping bags, jackets, trekking poles, and boots. Renting saves hundreds of dollars compared to buying new gear.
9. Are flights necessary for budget trekking?
Flights are needed for Everest Base Camp (Lukla) and some remote regions. Otherwise, buses and jeeps are more cost-effective for reaching trailheads.
10. How do I save money on transportation?
Use local buses, shared jeeps, or group transport instead of flights. Walking and cycling in cities like Kathmandu and Pokhara also cut costs.
11. Is Nepal safe for solo budget trekkers?
Yes. Popular treks are safe, well-marked, and frequented by other trekkers. Carry basic safety gear, maps, and travel insurance for peace of mind.
12. What is the average cost of guides and porters?
Guides cost USD 20-35/day, while porters charge USD 15-25/day. Sharing services with other trekkers reduces costs further.
13. How much do trekking permits cost in 2025?
- TIMS card: USD 15
- National park/conservation area permits: USD 23
- Restricted areas: USD 50-500 depending on region and duration.
14. Can I trek in Nepal on a tight budget?
Absolutely. By choosing budget-friendly treks, staying in teahouses, eating local food, and traveling off-season, you can trek Nepal on as little as USD 13-15/day.
15. Do I need travel insurance for budget trekking?
Yes. Even on a budget, insurance is crucial to cover altitude sickness, injuries, or evacuation. Budget-friendly plans start at USD 50-70.
16. How do I save money on food during treks?
Stick to local meals, carry snacks, and refill water bottles instead of buying bottled water. Avoid western dishes to minimize costs.
17. Are teahouses comfortable for budget travelers?
Yes. They provide basic rooms, blankets, and meals. Off-season discounts are often available, making them ideal for budget trekking.
18. Can I trek independently in restricted areas?
No. Restricted regions like Upper Mustang, Dolpo, or Manaslu require a licensed guide and special permits, which adds to costs.
19. How can I minimize hidden trekking costs?
Avoid frequent device charging fees, expensive showers, and unnecessary souvenirs. Plan meals, carry essentials, and share services when possible.
20. Is Nepal suitable for first-time budget trekkers?
Absolutely. Shorter treks like Poon Hill or Langtang Valley are beginner-friendly, affordable, and provide a full Himalayan experience without overspending.